

Alright, so it’s The 21 Day Sugar Detox time again! Oh…..you say you’ve never heard of it? Well let me introduce you to my favorite way to detox from sugar, stop my cravings, drop a few extra pounds and just over all, clean up and reset my Paleo lifestyle.
So why do I like THIS program so much?
The materials: The downloadable e-files are professional looking and clean with lots of infographics that make everything super easy to understand. It’s also loaded with information about how sugar effects the body, what sugars are best when you’re NOT on the 21dsd (if you’re going to indulge that is) and much, much more.
Plus, you also get loads of recipes to start you off, with great looking pictures and easy to follow instructions. Throw in some great tips on planning ahead and making the 21 days manageable and it’s a darn near perfect guidebook for success.
My favorite part though is that you know exactly what you can and cannot eat. No ambiguity here; it’s all laid out for you. There’s even 3 different levels that you can choose from depending on what amount of “detox” you feel comfortable with. So if you or someone you know is feeling a little squeamish about he whole thing, just try starting off at level one…I promise, it’s really not scary at all.
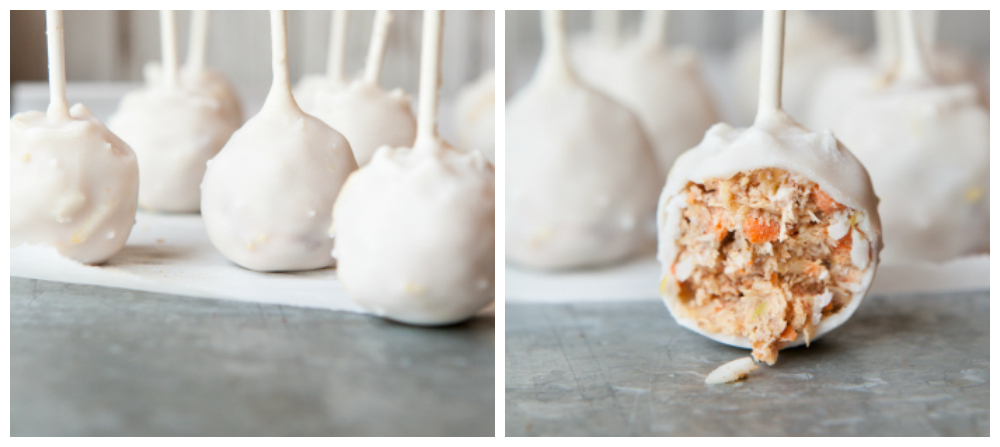
Ok, Ok….so what about these crazy little dessert “bombs” I have for you here? (And how exactly do they fit into a sugar detox?!?) Well on The 21 Day Sugar Detox you are allowed the option of having 1 granny smith apple or 1 green tipped banana per day.
You don’t have to eat them, but the point here is….if you need to, you CAN! Yes….they do have some natural sugar in them, so why are they allowed, you ask? Well I recommend that you read the 21dsd manual because the answer is in there.
As for me….I’m just glad to have them with me on my 21 day journey! And having detox friendly “treats” around the house was pivotal in helping my kids adjust to and realize they could love a “not so sweet treat” as much as a sweet one! This has really stuck with them and they love pretty much all food snow….sweet or not. So, there really can be benefits to “detox treats”! I’d even say it’s actually reduced the amount of emotional eating in our house. When there’s no sugar rush to accompany treats, you no longer go to them for that “fix”. Now it’s JUST a treat, full of good nutrition. And nutrition tastes good!
These lovely cakeballish looking treats are made with 2 Granny Smith apples, (AND the juice is squeezed out of them which makes them even lower in sugar). In reality if you get about 10 “bombs” out of this recipe you could technically eat 5-7 cake bombs in place of 1 Granny Smith apple! However I recommend spreading them out over a day or two. Or even better…..share them with a friend! My kids aren’t really “sharers” during The 21 Day Sugar Detox though….so I’m lucky if I get any at all.
Find out more about The 21 Day Sugar Detox HERE. You won’t be sorry.
(Now these treats are a bit unusual for me to create in that they are less sweet than my average creations. They are delicious as a treat during a sugar detox and we even enjoy them as regular treats ourselves. However family, friends and children may need fair warning or they will find them strange. When your taste buds are used to super sweet, not so sweet can be an adjustment.)
21 Day Sugar Detox Lemony Carrot Cake Balls
Makes about 10 cake balls
Ingredients:
For the Filling:
2 large Granny Smith Apples (about 1 lb), peeled, cored & quartered
1 large carrot (add more carrots if they are small)
1/2 cup or more of “Let’s Do Organic Shredded Coconut* (Buy it here)
3 Tablespoons almond butter or cashew butter, etc…
1/3 cup crushed or finely ground pecans
1 1/2 teaspoons ground cinnamon
1/4 teaspoon nutmeg
1 teaspoon REAL vanilla extract
Lemon juice (about 2 tsp) and zest of one medium lemon
2 teaspoons of the carrot/apple juice as needed for a workable texture
For the (unsweetened) Coconut Cream Coating
1/2 cup coconut butter, melted** (Buy it here)
2 tablespoons coconut oil, melted
1 teaspoon REAL vanilla extract
zest of one medium sized lemon
OR dip in Melted chocolate like in the original sweetened recipe HERE
Note: Keep in mind the coconut butter coating is unsweetened and will taste like a smooth, hardened coconut butter. It is not sweet like white chocolate.
Method:
1. With a hand grater or food processor with grater attachment, grate the prepared apples and carrots. Squeeze the mixture a few times to loosen the fibers. Transfer to a nut bag, cheesecloth or fine mesh strainer and squeeze or press out as much juice as you can. You should get about 1/2 cup of juice and 2 cups of pulp if using 2 large Granny Smiths. Set the juice aside and transfer the pulp into a medium sized bowl.
2. Grate the lemon zest with a fine greater and add to the bowl. (Don’t skip the lemon zest as the bioflavonoids add flavor that make up for the lack of sugar.3. Now combine the rest of the filling ingredients together with the carrot/apple mixture. Using your hands, mix to combine well.
4. When the “dough” is ready it should be able to hold a nice ball shape and not be too dry or too wet. Don’t worry it’s not a science. If it seems too dry or too wet, all you have to do is add more juice or more shredded coconut. The amounts may vary due to the differing size of apples and carrots.
5. Form the dough by gently squeezing some dough back and forth between your hands. Them roll into golf ball sized rounds and place on a parchment lined baking sheet. The more smooth and uniform they are the better they will look when you add the coating. If desired put a popsicle stick at the center of each cake ball. Be sure that the dough forms around the stick.
6. Transfer to the freezer for 30-45 minutes or until just firm.
For the coating:7. Melt your coconut butter and coconut oil till just liquid. Do not over heat either. (For the coconut butter/cream I like to bring a small pot of water to a boil, remove from heat and place the jar of coconut butter in the pot. It should be deep enough to submerge at least 2/3 of the jar. Allow to sit for about 15 minutes. Open the jar and stir it up till smooth. It should now be pourable.)
I8. n a small bowl or short drinking glass, combine the all the Coconut Cream Coating ingredients, stirring to mix well. This recipe should make enough coating to dip the cake balls twice. This way the coating is not transparent and has a better “snap” to it. However, make more if needed.
To assemble:
9. Take an egg carton and turn it upside down. Using a skewer, poke medium sized wholes in each section. If you don’t care about the tops being smooth and pretty you can skip this step and just place the dipped balls onto a chilled parchment covered cookie sheet and let them “set” there. See tips for more options.
10. Remove the cake balls from the freezer. Take each cake ball and dip it in the Coconut Cream Coating, letting the excess drip off. It should begin to harden. If the sticks are not secure, remove and dip one side in the coating, then place that side into the cake ball and hold for a few seconds till secure. Then continue dipping.
11. Place the cake ball, stick down into one of the prepared egg carton sections (or cake ball side down on parchment paper). Continue to dip the rest of the cake balls in a like manner.
12. Starting with the first one you dipped, go through and dip each one again for a nice thick coating and a uniform look. Stir the coating mixture periodically to be sure the coating is even and the zest is distributed throughout.
13. Allow to sit until the coating is set, then transfer to an airtight container or baggie and store in the fridge.
Cake balls are best eaten slightly chilled but not frozen.
Makes about 10 servings from 2 Granny Smith Apples, making 5-7 of these little guys your optional daily approved fruit (1 Green apple or green tipped banana per day) Or you can go conservative and eat just one or two…..ah who I am kidding?
Enjoy your 21 Day Sugar Detox!
TIPS: The Coconut Cream Coating can always be made thicker or thinner just by adding more coconut butter (thicker) or more coconut oil (thinner)If you are not using popsicle sticks, you can just skewer the chilled ball and dip it into the coating that way. Or place it on a fork and spoon the coating over the ball.

Wow, these sound good!!!
Holy Moly – these look completely awesome – can't believe they are legit!!
Yeah, I've said it before and I'll say it again – you are awesome. These look amazing and just what I am needing right now.
Made these tonight after seeing your post. So delicious! Tastes like a cross between apple pie and lemon bars to me. Thanks so much for this amazing recipe!
Amazing.
oh how cute!! I've seen cake pops like these at the farmer's market. this flavor combo seems so nice.
You are my HERO!! WTG w/this awesome post!!
I was just saying how I'm a reformed cake pop princess and now.. maybe I don't have to be! Ahh!! You *ROCK*!!
Hopefully, my pin of your work will be helpful like you've been helpful to me.
K-
These look phenomenal! Pinning for sure 🙂
Looks amazing, just hand written the recipe as I am out of ink. LOL.
Thanks and cannot wait to make.
I have been sugar free since 1985. I just found your blog and I love it here!!! Big hugs from your newest follower. P.S. I invite you to share your wonderful blog at my Thursday Favorite Things blog hop.
These taste amazing – I can't believe they are sugar free!!!!
We really loved it, thanks for sharing!
I can't wait to try these! I'm completely obsessed with carrot cake. I think I might try the sugar detox after all of the holiday goodies. Really great recipe! Perfect little sweet treat to pack in my lunch.
I have been wanting to make these for some time, unfortunately I will have to hold off as I'm doing AIP and have eliminated nuts. I am wondering if anyone has used the Coconut Cream coating for other desserts like cookies? Because it hardens I am thinking it could be a good substitute for royal icing.
It only works well for coating here because they are chilled. Coconut butter like all coconut oil products, melts at fairly low temps. So it may not work well for Royal frosting unless the dessert is being chilled. And after thar it won't be able to sit out long without melting again.
Thank you so much for responding. Your post was very helpful. I love this blog and please keep those 21DSD recipes coming!
Just made these (without the coating) and they're delicious! I added some spirulina powder for extra superfood-y goodness. Can NOT wait for your book to come out!!!!
these are crazy awesome. the lemon flavor was really noticeable and so good!!! definitely one of my favorite 21 dsd recipes i've tried.
When I had to give up sugar, this recipe saved me! It feels like a "sweet treat". So yummy! Thanks!
Wow…. detox apple… I like it,, thanks…
It is the most tasty weight loss program)) Thank you so much
I love the combination of coconut butter and oil, add lemon and you’ve addicted my mouthenly mind for life *swoons*.
Oh. My. Gosh! Jenni, I just made this mixture, but only had Honeycrisps, and didn’t make a coating…so, what I’m sayin’ is, I’m pretty much just eating this by the spoonful and am IN LOVE! I know I need to try this with Granny’s but didn’t have any on hand…this is seriously amaze! zing! Thanks! You rock, as usual, and are getting me through another detox. Mwahhhh! Hope you and yours are well! xoxox
I made this with one sad apple i had on hand & 1 carrot & since its day 13 & i Haven’t touch a lisp of sugar i couLdn’t fiddle with squEzing the juice out. I Didn’t add more coconut to be able to Shape it in balls, it’s soft & scoopaBle & abso scrumptous! I ate neArly all of it! ? There were moments when i was wondering: tgere is no sugar in it, right? I didn’t put any, right? It’s so sweet for my palate, i thought i was going crazy! LOL Thank you! Thank you for offerring something sweet while i survive this! ?
Hi!! I was look for an olD reCipe of yours and im woNdering if this is it… Raw carrot cake balls. If i recall corectly they were coated in chocolate. Is the apple/carrot part the same? I dream Of them sometimes! ? thanks
Yes essentially the same recipe!