

What is Honey Caramel?
Caramel has many different faces; I mean seriously, it’s like a complicated woman….(not that I would know anything about that). It can be runny, soft, hard, thick or even viscous like molten lava. You will find some caramel that’s made with butter and some without; the same goes for cream. In fact, this past Christmas we made a dry caramel entirely out of just sugar! Yep….just one single ingredient. Caramel can be successfully made from any number of different sweeteners ranging from liquid to dry (eg. sugar, maple sugar, honey, maple syrup, etc, etc…)
The methods for making caramel vary about as widely as the ingredients do. Different methods can produce fairly different results but in the end……all roads lead to DELICIOUS. This Honey Caramel recipe that I’ve prepared for you here is wonderfully thick, creamy and spreadable. Essentially, it’s Dulce de Leche, made with coconut milk and honey. This makes it perfect for topping donuts, filling cookies, cakes and of course, eating with a spoon (again, not that I would know anything about that).
Easy 3 Step Honey Caramel
Makes about 1/2 cup. Recipe can easily be doubled.
1 teaspoons vanilla extract
*A strong flavored honey will produce a strong honey flavored caramel. Lighter honey, such as clover or orange honey works best. A mixture of a light honey and maple syrup is delicious as well.
Method:
1. In a medium heavy bottomed sauce pan, combine all ingredients and bring to a gentle simmer over medium heat. Turn the heat down to a medium low and continue to lightly simmer undisturbed until reduced by about half, and it reaches a nice golden amber color. This can take anywhere from 50-60 minutes.
2.Toward the end of cooking, stir often to keep the mixture from burning badly at the bottom of the pan. However some burning will give the caramel a nice rich flavor. Just stir often to incorporate the small amount of burnt pieces into the caramel. Cooking times vary significantly depending on the width and thickness of your pot, stove, heat and batch size. Just roll with the nature of candy making. The gorgeous amber color is key is key!
3. Remove from heat and transfer to a glass bowl. Let the caramel sit and cool to a lukewarm temperature, then stir, somewhat vigorously till it becomes smoother and glossier. Use or cover and store. Don’t worry if you did’t quite get it to the thickness or color you desired, you can always reheat and cook longer till it’s just perfect. And if it thickens up a bit too much after cooling, simply gently reheat in a bowl, over simmering water. Add bit one teaspoon of room temperature water at a time, till it reached the consistency you desire.
Storing: This caramel spreads/coats best while still slightly warm. You can also make it ahead of time and store in the fridge if you like. Just be sure to gently reheat in a double broiler until it reaches a spreadable/dip-able consistency before using.
Oh my goodness I have been waiting patiently for this recipe. Such a tease seeing these on Instagram all week! 😉
This looks sooo amazing and the photos are so perfect. You have done it again! I cannot wait to try this.
oh my dear god! I think I love you
Can you use coconut oil instead of ghee?
Sure, I use palm shortening first if not using ghee as it is a more similar fat but coconut oul works fine and I've tried it that way. Ghee results in the best flavor and texture and bonus it's casein and lactose free.
I see a lot of talk about Ghee and butter, but I do not see it in the recipe. Can you tell me if it needs to be added? We have embarked on the gaps diet due to many health issues in our family, and our children really miss caramel and dulce de leche.
thank you so much for all the wonderful recipes!
Nope the recipe is as listed.
I'm not paleo, probably never will be, but I do want to rub that caramel all over my body.
WANT!!! apples need to be dipped in this, stat!
Are you serious?! This is amazing!
Do you think this can be used for a custard flan? heeheheheh.
Love flan, but this caramel ecipe wouldn't be best. Flan caramel is usually a dry caramel made just from cooking sugar by itself into a caramel or a mixture of sugar and water. The high fat content of this caramel wouldn't be the best for flan.
Spectacular! You are brilliant lady. Can't WAIT to make this for the family. I see this swirled in my vanilla bean ice cream. Swoon.
Be Well,
–Amber
Looks really yummy, wondering how long will this caramel last in the fridge? Thanks. Kris
No idea, it never lasts that long around here, haha! High sugar stuff usually does pretty well though.
By reducing the coconut milk you are essentially refining the sugar in the milk just like sugar manufacturers do with cane syrup. You are going to get just as hard a glycemic hit from this as if it were made from sugar.
A great one in a while treat? Sure! A "healthy paleo" excuse to dip things in caramel? No.
Yes, I am aware of the process. I don't use honey cause it's a better glycemic load. I use it myself and created this for those who can not have cane sugar. I am highly allergic to it myself. Really all sugar has a similar tax on the body and should be eaten in moderation. How much one eats of any sugar if any is really dependent on each individuals situation and Paleo "lifestyle" choice.
Thank you for making and posting this. I cannot have cane sugar but I can have honey and I love caramel. I actually have to do more of the paleo since I developed my auto-immune deficiency/ and leaky gut.
Yes! I think I can manage to make this! I will probably eat it though before it can be used for anything though. I'm still making it though!
Looks great! Those photos look like the best kind of playing with your food ever! x x x
So have you written a cookbook yet? My mom (a chef) says that you are a "BRILLIANT young woman". The only other chef she has ever said that about was Chef Jamie Shannon (Commander's Kitchen), so that should tell you something. We would both buy your book.
Yes! Where has this been all my life? Thank you for sharing — this is wonderful.
Wow ! love all your recipes they look and taste sensational. Just wondering as I have no issues with butter if I could just use butter instead of ghee? imagine so, but thought I would ask just in case.
Yes, absolutely you can use butter. Ghee makes a wonderful texture in things like caramel and sauces though, but they both work and taste great.
If I was to use this as a filling for a cake, do you think it would run too much once we cut and serve the cake? Or, if I cook it longer so it gets thick, will it keep most of its shape?
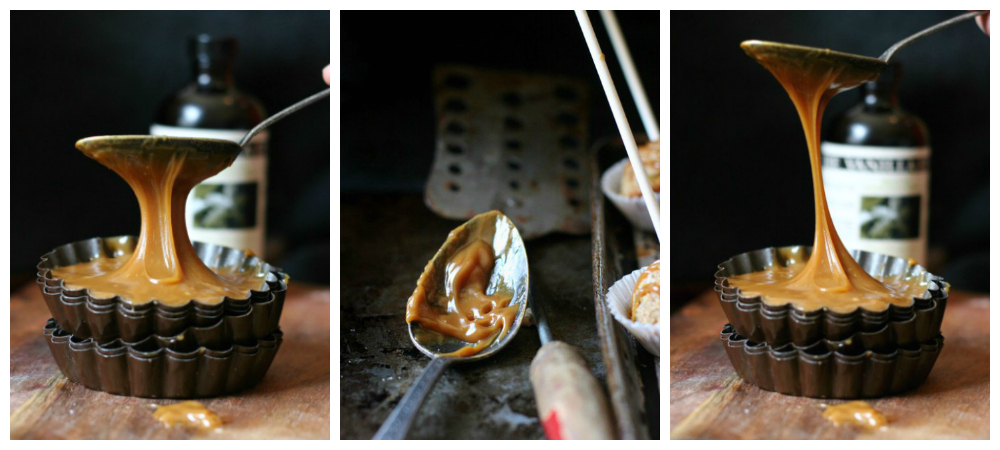
This caramel gets pretty thick once cooled. Of course it also depends on your stove and pan. This pick was taken before it cooled, which is why it moved in the pic. Once cooled it didn't have movement at all. I'd make it once on your stove as a test run, cool it completely and see if that is the texture you want. You can increase or decrease cooking times from there.
OH MY! OH MY! OH MY!
I am thickening this amazingness up as I type with grand plans to top Sarah's (My New Roots) raw vegan brownie…. that is, if any will actually make it to the brownie! I can't seem to keep these piggy fingers out of it. So, So, SO GOOD! 🙂
I actually have tears in my eyes. Haven't had "legal" caramel in almost a year. Can't wait to try it (and add it to my coconut milk vegan ice cream!!).
Wow, that looks incredible. I feel a salted caramel blondie coming on. Uh, make that a pan of salted caramel blondies. Coming on to the thighs.
The pictures were enough to make me want a big spoonful, but then as soon as I saw that it was made with honey I knew I wanted to try it. Thanks so much for the recipe!
This is the best caramel recipe I've seen thus far – not only because the pictures are gorgeous, but because of the simple ingredient list and easy instructions! My dad is going to be thanking you enthusiastically when I make it for him!
This looks amazing! Do you think this could thicken and set up enough to make caramels? Any tips you would try for that? Thanks!
We use it to make soft caramel candies all the time. Just cook it longer. Honestly mine always turns out thick enough to make caramel candies. But cooking times will vary depending on how hot your burner runs. The thing about caramel candy recipes is that the caramel often has to set for several hours or over night before making into squares and wrapping in parchment paper pieces.
This sounds great. I love finding recipes that use honey instead of refined sugars! Do you think using milk would create the same product? I used to have dairy issues, but now that I buy raw milk, I do great and I prefer not to using alternative milks.
Cream would work well.
Is it a problem if my coconut milk has guar gum in it?
Not a problem.
Thank you for the recipe. I wanted to eat caramel but since my husband and I adapted no sugar diet… honey and stevia were our options. So this is really good. Plus the fact that I am a not consuming milk products… so coconut milk is really good:) I am making it now. Hoping it will turn out good – Groetjes from the Netherlands
Question about the ingredients….When you say 2 (1) do you mean 2 cans or 1 can? I so want to make this….:o)
2 for a full batch and 1 for a half batch.
Isnt this the EXACT same recipe as post by PaleoOMG?
http://paleomg.com/guest-post-samoa-donuts/
Actually it is my recipe that is on Paleo OMG. However the instructions here are more detailed as I only had so much space to share alongside my Samoa donuts recipe. At the same time, caramel recipes are really pretty much all the same. Just the nature of caramel.
Amazing! Tastes better than caramel!
can I use maple syrup in place of the honey?
Yes that should work well.
I will happily get fat on this stuff, all this diet nonsense is for people who eat boring food xD
CARAMEL! !! Thank you 🙂 xxx
This is the best caramel recipe I have found ??. I did try this today but it was still very runny-did i take off heat too soon? I was worried if was getting too dark in colour but I think I should have kept it on longer. Still tastes very good, I have used it as a centre in chocs but wanted this thick texture. Any tips would be appreciated. Love all your recipes.
You can keep cooking to make it thicker. The times will vary quite a bit depending how thick you pot is and hot your burner is. There is no exact cooking time.
Thank you!!! I’ve been stuck on a tortuous diet by my doctor for a gut issue. I’ve done well for 5 months but always fall off the wagon when I get PMS. This will give me something to reach for that’s allowed and not send me on that slippery slope of craving and caving for food I can’t HAVE.i think you just saved Me with this recipe. Delicious too. I added coconut extract to my first batch. Next one I’m going for ginger and lemon.
How long can you keep the Caramel sauce in the fridge for?
I’ve not tested that for certain. BUt anything high sugar has a pretty good keep time.