

Bread: Every culture, in every time period, through all of history has had some version of it. From ancient raisin cakes to modern day baguettes, there are a million different varieties but the one thing that remains consistent is that regardless of time or culture or tradition, people have always gathered together to “break bread”.This has certainly been the culture for our family. That is, until we had to go gluten and grain free. Possibly one of the most significant changes that we’ve made, as a family, is shifting our diet away from always having a “bread” element in our meals. And to be honest, after a couple of years this way, I can honestly say that I don’t really miss that way of eating. But…..there are those times when some kind of bread is just what the meal calls for and so, I set out to make that a reasonable (and tasty) possibility. And with sourdough being one of my favorites….I thought, “Why not start there?”
What to expect: As with all of my recipes, my goal is never to make a counterfeit replacement for whatever food has become a casualty of my dietary restrictions. Instead, I choose to celebrate food in whatever way I can, by creating recipes that capture the heart and spirit of the foods that I’ve always loved.
As such, if your goal is to bake up a carbon-copy substitution for the big yeasty, almost overly fluffy loaf from a grocery store, then you might need to adjust your expectations. What you WILL find here though, is a wonderfully flavorful, slightly tangy loaf with all the body and substance of a traditional quick-bread. You’ll find this bread to be very reminiscent of those “old world” artisan sourdoughs that surely won’t disappoint. Artisan breads have a density that lends themselves well to dipping, toasting, grilling and over all sinking your teeth into!

Getting started: This is a simple ingredient recipe without any added fats or starches. I’m sure that I’ll be sharing my many variations with you in the future, but for now, if the following steps seem a little daunting at first, let me encourage you that it’s really is more simple than it looks, and is WELL worth the effort. Not only does the culturing of this batter/dough make a great tasting bread, but it also makes this bread easy on digestion and lower in sugar than “non-cultured” cashew loaves.
You will notice that I have only listed the weights of the water and cashews. This is because measuring whole or pieces of cashews by the cup is very unreliable due to the way that they fill up space as compared to flours. This can easily result in to much or too little cashew to water ratio for the recipe. In reality scales are the best way to go when you want consistent baking results. But especially when working with whole nuts or pieces. I always recommend people invest in a digital kitchen scale as it makes for super easy and reliable baking outcomes.So here it is….enjoy.
Things you’ll want to know about culturing before you get started….
Culturing in the oven:
Place the covered bowl in the oven and turn the oven light on. Leave the mixture there for about 12-up to 24 hours. I leave mine overnight and bake in the late morning.
Keep in mind that some oven lights may not create enough heat to successfully culture, however, in all the ovens I have ever had, this has never been a problem. The temp should be around 105 degrees up to 110 degrees and the mixture should taste good and sour when it’s done. Culturing cashews is not nearly as sensitive as making yogurt since you are not trying to get anything to “set up”. But the amount of “sourness” you get does depend on the environment.
Troubleshooting:
If the environments is not hot enough is will culture to slow or not at all
If the environment is too hot it will kill the living bacteria and not sour at all
If the environment is too hot, it will bake the mixture instead of culture it.
Other methods for culturing: Here are a number of other options for culturing the cashews. I always use the oven method myself as it is super easy and it works every time. However if you would like to try some of these other methods they work wonderfully as well. You can click on them for more detailed instructions.
Grain Free Cashew “Sourdough” Bread
Ingredients:
10 ounces raw cashews or cashew pieces* (cashew pieces are generally cheaper)
4 ounces filtered water (about half a cup)
Enough probiotic capsules to equal about 30-40 billion strains***
2 large eggs, separated
1 tablespoon filtered water
1/2 teaspoon baking soda
1/4 teaspoon sea salt
One egg yolk plus 1 teaspoon water for egg wash
*10 ounces cashews is about 2 cups. However ‘cups’ is an unreliable way of measuring whole nuts/pieces
***The probiotic is what cultures the batter and makes it sour. I use THIS brand, but there are many brands that work well such as Jarrow, which is found at most health food stores. They come in all different amounts of strains per capsule. Use as many capsules as you need to get about 30-40 billion)
Method:
You will need a 7.5 X 3.5 inch Magic Line bread pan or one of equivalent size or double the recipe for a standard size loaf pan.
For the “sourdough” starter:
1. In a food processor blend together the cashews and filtered water until very smooth. Stop and stir as needed to keep the mixture moving as it is quite thick. Be patient, this could take up to 10 minutes depending on your processor. You don’t want it to be too grainy.
2. Transfer to a non reactive bowl (such as glass or ceramic), add the probiotic powder and stir till well combined. The mixture will be quite thick. Don’t worry about that. Be sure to stir the probiotics in very well.
3. Cover the bowl (I use a plate to cover the top and so it doesn’t dry out. Place it in the middle of your oven with the oven light on. Do NOT turn the oven on too low. Just like making yogurt, the cashew mixture needs to be in a slightly warm environment between 105- but no more than 110 degrees for at least 12 hours or even up to 20 hours. I leave mine over night and bake in the late morning. The longer it sits the more sour it becomes. (See more culturing options above in the written part of the post.) Note: if the environment is too hot it will not sour as it will kill all the living bacteria
4. THe next day, when the culture is ready, preheat the oven to 325 degrees or 300 for convection.
5. Prepare your pan by greasing and lining it with parchment paper. Make the paper long enough so that it flaps over both long sides of the pan.
NOTE: If you choose to use a standard loaf pan instead of the size listed above, you will need to double the recipe (baking times will vary).
6. Transfer the cashew mixture to a larger bowl. Take care to get as much of it transferred as possible. Using a rubber spatula works best for this.
7. Separate the egg yolks from the whites, putting the egg whites into a medium sized bowl. Add the yolks and tablespoon of water to the cashew mixture and beat till smooth and lump free.
Rinse and dry the beaters so they’re ready to beat the egg whites. Just Before beating the egg whites stir the salt and baking baking soda into the cashew mixture.
8. Beat the egg whites till soft peaks form. Gently fold them into the rest of the batter till the egg whites are no longer visible. Tip: When beating egg whites, be sure not to over-beat into a firm peak or they won’t fold into the batter well. When you turn your whisk upside down, the peaks should just be starting to hold. They’ll be soft and should melt back into themselves after a second.
9. Transfer the batter to the prepared pan and gently smooth the top. Batter MUST fill the pan about 3/4 full or you will not get a nice round loaf.
10. Prepare the egg wash by whisking together the egg yolk and the water smooth. Using a pastry brush, very gently brush the egg wash on top of the bread batter. This takes a gentle touch.This will give the loaf a nice crusty finish and help it brown nicely.
11. Bake at 325 degrees/300 for convection ovens, for 50 minutes (or tip the top sounds hollow and solid when tapped on. Times can vary).
12. Leave the bread in the oven and turn the temperature up to 375 degrees. Bake for another 5-10 minutes or until the top is golden and crusty. Baking times can vary from oven to oven.
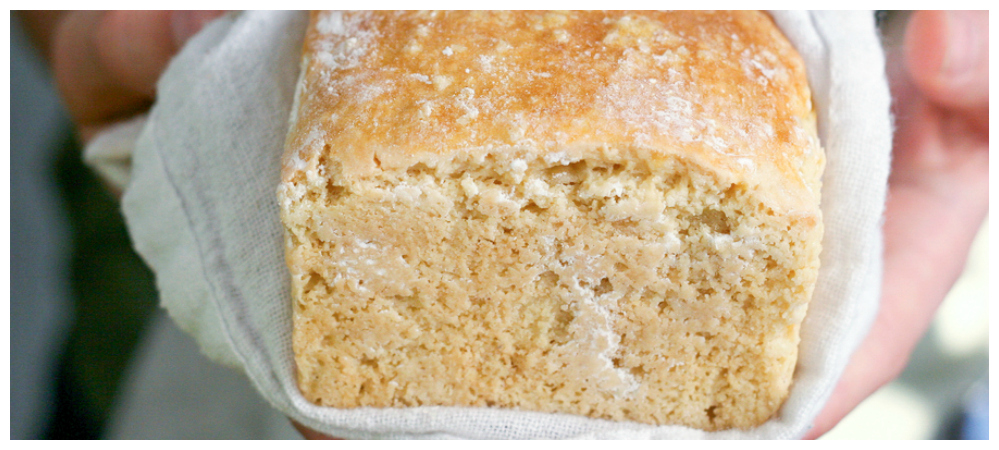
NOTE: Do not worry if the top cracks some. Remember this is a quick bread and the sign of a good rise in quick breads, IS some cracking at the top of the loaf. The loaf in the above pictures happened to crack on the side so you can not see it as well.
13. Remove from the oven and allow to cool for at least 10 minutes. Do not cut into it right away as the moisture needs time to redistribute. Nut based breads are actually at their best, “next day”.
Once cooled…..slice, serve and enjoy the awesomeness!
This recipe seems very interesting and I hope to try it soon! I was curious, have you ever tried to use kefir water or milk/kefir starter to culture instead? Do you think it would work?
The hard part would be knowing how much probiotic strain is present in the water and how much water would be needed to get a good sour on the cashews. If too much is needed then the dough will be too wet.
Where do i get the probiotic
There are a number of sources listed,but any healthfood store.
I am curious If You could do THis in Aninspot, culture it like you do with a yogurt setting, I have done Cashew yogurt
Yes I should think it would work. I lost yogurt makers as an option in the post. Basic culturing rules apply. Not too to kill the bacteria, not to cold that it can’t ferment.
I am wondering if apple cider vinegar would not work in place of the PROBIOTICS as I use that in my almond/brown rice/garbanzo bean dosas that I make and they ferment quite well on the counter her in northern california though it might take a few days
Personally I would not recommend it since it would take so long. Cashews can get nasty and bad In that time. Even turn purple. Dosas are a bit different considering the carb and lower fat content than nuts.
Hi there!
I normally soak then dehydrate my nuts to get rid of the phytic acid…. Would it be okay to use these cashews you think? Or should I stick with raw, that haven’t been soaked?
The fermenting pretty much does the trick here in regards to the phytic acid. There really is no need to soak.
my phone DOEsnt like a word, so Trying RHis Again, can We do This with an instapot, like on THe yogurt setting? thanks
I must yogurt makers as an option in the post, so yes I’d think it’d work. Just like with yogurt, it’s just about not killing the bacteria that cultures it, but warm enough for it to grow.
OH. MY! This is AWESOME!!! I use cashews for other recipes never knew about this process! I know my baking project for the weekend!!
What happens if I leave the pro bugs out of the recipe? Does it just result in a flavor change?
Yes, it won’t be sour at all. It also won’t rise well unless you add another acid to replace the fermented cashews.
I wonder if you could use apple cider vinegar instead of the probiotic capsules?
Really a probiotic or yogurt starter is needed for the proper fermentation.
When you say yogurt starter could be used, what exactly would that be? And how much would you uses? I have plain full fat greek that i use when i make yogurt and thats all i’ve needed for my homemade yogurt so far.
I don’t think a yogurt starter would work well unless you know how much probiotic is in it. Though I do say a tougher maker would work. The probiotic capsules work excellent though for fermentation and are also easy to get
Nice looking recipe for my Keto fun / foolishness. Thanks for posting!
Questions: is it necessary to separate and beat eggs in peaks? That adds a lot of effort and I’m looking for something easyish. (Iv’e made a LOT of sourdough in general, so the rest is nbd.)
2 – I’m trying this with a sourdough starter (Rye based) instead of probiotics. Any thoughts on how this will work/fail?
Beating the egg whites separately give it’s the lovely texture. Yes it makes a difference for sure. Andnit only takes a few minutes extra. As tontue starter, as long as it has enough probiotics it should be fine. Could speed up or slow the fermentation time depending on the amount. It’s definitely very different than makin actual sourdough.
Just pulled my loaf out of the oven. You make me look like a badass! Thank you for your amazing book and blog ☺️
I just made it and it turned out great! I used less probiotics than you called for (they are so expensive!) but life got crazy and it soured for 36 hours instead of 12. I decided to try it anyway and it was perfect. Next time I’ll increase the salt to 1/2tsp but otherwise I won’t tweek it at all. Thanks for a great recipe!
My probiotic capsules contain 80 billion. Is that too many or is that still ok?
Since the recipe calls for 30-40, I’d say use half of that capsule or double the recipe.
I made this today, started last night. It is truly delicious!
Thank you,
Donna
How long do you think the shelf life is for this bread?
Well all bread that doesn’t have preservatives has a very short shelf life. That os why bakeries make and sell it daily. So I’s say eat day of. And it’s a tiny loaf so that isn;t hard to do. you could always try freezing it otherwise. Of course it won’t be as good as fresh.
I’m set out to make this today, how important is the filtered water? Will it affect the fermentation if I just use tap water?
No it will just affect the taste. Though starting with pure water is definitely safer for fermentation purposes.
I dont have a food processor to mix up the nuts, can I use a paste ground in store (like wholefoods) instead?
You won’t likely be able to get it smooth enough for a good bread batter.
Would almond flour work instead of cashew flour?
Yes it can work. Cashews have a higher sugar and carb content, so they ferment more quickly and easily. Fermenting times may take longer to get a very sour taste.
Can I make rolls instead of a loaf?
You would have to use something in the shape of a roll as the batter is runny.
Any one been successful with an egg replacement? We have allergies.
Unfortunately it will just be a sticky mess with an egg replacement.The eggs are very much responsible for the rise in this case.
Lisa, i too, have aN allergy to chicken eggs, but am not allergic to other types of eggs. I have found a local source of duck eggs. Have you tried other types of eggs?
We also have an ALLERGY to chicKen eggs. But we have had no problems with duck eggs! We use them to replace the chicken eggs in recipes, and in any other way you would use chicken eggs, might be worth a shot! 🙂
Definitely! Weight thebwgg by weight once cracked so that it’s the same as a large chicken egg. I have a post on here about exchanging different eggs.
This bread is AMAZING!!!!!!! It is a nut bread that looks and acts like a regular bread-beautiful shape, smooth, holds together-and the fact that there is no sweetener in it and it is fermented! Well that is just the bomb! Thank you soooo much! You have made me and my husband very happy! 🙂
Two questions. Any chance you have the nutritional breakdown, and I noticed one of the posts you wrote that the dough is too runny to make rolls out of. I’ve made this 2ce and my dough is anything but runny AND I don’t really get a sourdough taste. Any idea on what I am doing wrong? I still like the bread but was hoping for the sourdough taste. Thank you. 🙂
The sour taste is entirely dependent on the quality of probiotic and the environment it is in. If it into sour before baking, it won’t be after baking.
It’s not a runny dough, but it is not shareable like a bread dough as it is a quick bread. And it definitely won’t taste exactly like a wheat sour dough bread as it is a quick bread and not a yeast bread.
It is sour dough because it is fermented. How fermented it will taste is variable depending on how fermented it gets.
I really want to try this recipe, but I can’t get my oven to 105 degrees. The lowest it will go is 170. I do have an instant pot, though — any chance I can use it for this? If so, how?
Also – do I need to use a sterilized container for this step? The instant pot’s yogurt making function calls for using sterilized jars.
And one more thing – haha – if I soak the nuts overnight and then dump the water to get rid of the phytic acid, can I still resume from step one and sour the nuts with probiotics for 12 or so hours?
You don’t actually turn the oven on, JUST the oven light. If your instant pot has the yogurt setting on it, that would work. There are a number of links in the written part of the post to different methods that can be used other than the oven light one.
Can you use something othEr than cashews? i am anaphylactic to them as well as pistashioS.
Also, i dont know why, even though my caps lock is off, it is sTill typing in caps. I’m sorry. I really am not yelling.
Almonds will work, though they can take longer to get well fermented because they naturally have less sugar. They also are not as soft as cashews, so blending can take longer as well.
H!
I have an egg allergy, have you tryed this recipe with egg REPLASEMENTS?
Pam
Sadly this recipe does not work with egg replacements as the egg is used for volume. It will just be very gummy as most grain free baked goods are without eggs.
Is t possible to make this with sunflower seeds instead and do you know how long they would need to ferment for? When blending, im assumin we are aiming for a flour or keal consisitency and not for a butter constitency, correct?
Cashews are the best for fermenting because of their carb content. They also have the most neutral flavor. I can’t say how long sunflower seeds would take to ferment or what the fermenting would do to them color wise. As to the blending, there is water with them so they wil actually be a smooth paste, not meal consistency. The smoother the better.
I have questions about the loaf pan size you used. At the top of the recipe, you say 7.5 x 3.5 and in the cooking directions part, you say 5 x 3.5 so I am CONFUSED as I do not have a Magic Loaf pan so trying to find one the right size. And will glass work just as well for baking the loaf? THank you
Just follow the link to it and it will take you to the pan.
Does the recipe work ok if the cashews are soaked before hand? Mainly as I typically use my blendtec blender in place of a food processor it it works better when the cashews have been soaked a while. Thanks. Really looking forward to trying this recipe looks and sounds awesome
Soaking them before hand would change the amount of water needed.
Yes it would absolutely change the water amount.
You would need to experiment with water amounts. The issue here is that you need to add eggs later and so you have to leave room for that liquid. If you add to much early on, you wouldn’t be able to fit the eggs without the batter being overly runny. I have done it in a high powered blender though like a vitamix before.
Baking soda vs bIcarb…
Does what you List as Baking soda include tartar, or is it purely bicarb of soda?
Thanks!
It is baking Soda, nothing else. The other with cream of tartar is baking powder.
My starter batter has been sitting in the oven with the light on for 20 hours. I tasted it & it does not taste sour at all. Is there anything I can do? Cashews are expensive &I don’t want to throw it away. Also, the picture shos a powdery flour-like substance. What is this? Thank you!
If it isn’t sour than either the ambient temp was too warm or the probiotics were not very ‘live’. Otherwise there is no reason for it not to sour. The “powder” is just arrowroot flour, lightly dusted on the loaf.
STarted thIs last night. My oven light wOuld not heat up oven. I did a hotwater bath method in a cooler over night. Just added more hot water this morning. What is the cashew starter suppose to look like when its ready. It doesnt have any bubbles at all yet?
It doesn’t bubble really. It just becomes sour. If it doesn’t, than either the temp was too warm or the probiotics were not very ‘live’.
Hello there, I really want to try this but I was wondering
How is the oven light supposed to heat up the oven?
It doesn’t heat up the oven. Actual heat will kill the probiotic and then it won’t ‘sour”. The light gets it just to the right heat environment for it to ferment. There are other methods suggested in the post for those who do not have an oven light.
This recipe is amazing. Thank you so much. It is absolutely going to be a stable in our home. Seriously thank you so much, it is delicious.
Thank you! So glad you LOVED it! It’s a favorite in our house too!
I have a steamer oven with a setting to ferment yogurt. Would this work for fermenting the casheW miXture?
Any way that you ferment yogurt will work.
Jenni, i love this bread! I just found out im allergic to grains 2 weeks ago and this is really helping with the transition in my life.
I’m wondering, to you think this Recipe would work with macadamia nuts instead of cashews?
Thanks for posting all the great recipes
-corinne
Yes,it can work well with macadamias. they can take a bit longer to get the really creamy smooth texture and they take longer to ferment as they are a bit lower in natural sugars. But they work great.
Does this make a mini loaf? Because 7.5×3.5 is not a very big pan but the picture looks like a bigger loaf. Did yoU double the recipe in the pic?
That was the pan used for the picture actually. However, my 12-year-old boy was holding that loaf as he was my only hand model at the time. So may be that is why it seems bigger to you. If you’d like a bigger loaf, doubling the recipe works well.
Could I use kombucha instead of probiotic capsules?
I would be very hard to know how much you would need and how long fermentation would take. With capsules, you can measure the amount needed. If there is not enough it can take longer and the cashews tend to go bad.
fabulous recipe – good idea for making nuts even more digestible by fermenting. what did you use in the picture for the floury look?
That’s a little bit of arrowroot flour!
Thanks for this awesome recipe. I love it. Ive made it twice and I feel the dough is a bit runny, impossible to egg wAsh. Do you think some PSYLLIUM husk or tapioca floUr would help to get it more doughy?
It could but it would change the rails of all the other ingredients as well. This is a quick bread though and should really be doughy. Think like you would, zucchini or banana bread.
THanks for the recipe. My oven light turns off after one minute, and my oven only goes down to 120. If i get a dehydrator, how would i ferment the cashew?
I have a link under Other Methods, that will take you to some great instruction s.
Do you have a carb count for this recipe?I understa that cashews are highEr in carbs than some nuts.
I have not done any carb count on this recipe. You. I’ll try plugging it into a macrao counter. But remember the fermenting eats up some of the sugar and carb in the cashews so it won’t be exact either way.
I put the ingredients in lose it app..if the loaf makes 10 slices its 8.3 net carbs per slice…but JENNi said that the PROBIotics would eat some of the sugsr content so it would be lower…
If if not eaten the first day do you recommend keeping in the fridge?
Yes, I’d refrigerate and toast!4
Where can you find the NUTRITIONAL information?
I have not done any carb count on this recipe. You. I’ll try plugging it into a macrao counter. But remember the fermenting eats up some of the sugar and carb in the cashews so it won’t be exact either way.
I made this last night and used it today to make a grilled cheese sandwich. It was very good. Not at all hard to make. Great recipe. Appreciate it very much
That sounds amazing!
Just made a loaf and it was amazing. I even threw in fresh rosemary and garlic. Perfect solution for carb counting foodies. Thanks for the recipe.
Oooooh the fresh rosemary and garlic soup fabulous!!!
Just want to confirm. If you mention degrees, is it FaHrenheit or Celsius?
Always Fahrenheit in the US
Baked it abouT 3 times now and it is wonderful.
Thanks so much for this wonder!
By now I buy the cashew already as a paste of course organic 100% natural nothing added. AnytHing to make it even easier than alrEady is.
Today i am baking my bread nbr 4 and i have added double probiotics, use Dr. MErcola’s one. I coulD smell the sourness when i walked in the house back from work 🙂
Again thanks,,, love this recipe
Thank you! I’m so glad you love it!
cAN YOU USE A BREAD MAKER?
I have never tried in a bread makes, though I suspect you’d need to double the recipe at minimum
I wanted to weigh in and give a huge heartfelt thank you for this recipe. I’ve been on the specific carbohydrate diet for 6 years and tried every grain free bread recipe under the sun and when I came across this recipe a couple of years ago it was a game changer for me. It’s wonderful. I use half a loaf to make open faced grilled cheese, or toast it in butter and top it with avocado and tomatoes. The other half I use for breadcrumbs for breaded pork chops or chicken, or use it as a topping for gratins or casseroles. Seriously, this recipe is everything. THANK YOU!!
This is so awesome to hear! Thank you for sharing. I am thrilled you loved it.
What’s the. Carb COunt on the cashew bread??
I have not done any carb count on this recipe. You. I’ll try plugging it into a macrao counter. But remember the fermenting eats up some of the sugar and carb in the cashews so it won’t be exact either way.
Can you use glass loaf pan? I couldn’t find on line.
You can use any small pan the size is what matters. This is for a small loaf. Unless you double the recipe.
How much caRbs are in one loaf?
I have not done any carb count on this recipe. You. I’ll try plugging it into a macrao counter. But remember the fermenting eats up some of the sugar and carb in the cashews so it won’t be exact either way.
What is the carb count of the bread?
I have not done any carb count on this recipe. You. I’ll try plugging it into a macrao counter. But remember the fermenting eats up some of the sugar and carb in the cashews so it won’t be exact either way.
My Cashew mixture is fermenting right now! I can’t wait to bake it tomorrow. Do you have a break down on nutrition, calories, etc.? Thanks in advance! 🙂
I hope you enjoyed the bread! I have not calculated the nutritional info on this. You might try plugging the ingredients into a macro counter. But also remember the fermenting eats up some of the carb and sugar in the cashews. So it won’t be an exact ninbee either way!
Do you have the nutrition information for this bread? It looks really good and I would love to make it, but I am trying to lose weight and maintain my macros (Keto) accordingly. Even if I could only eat this for a special occasion, would be nice to have some sourdough bread! Thanks!
I haven’t done the nutritional info on it. You might try plugging the ingredients into a macro counter.
I Passed this recipe along to my sister who does a lot of paleo baking & wonders if she could use apple cider and just let it set longer. Would that work?
It really needs the probiotic bacteria to ferment. Capsules are super easy to get or yogurt starter as well.
Jenni,
I just finished putting Everything
So it can ferment..cant wait to ake this bread…i will let you know how it comes out!
How long will the bread last?
I would say one extra day in the fridge if toasting. Much like day-old bakery goods. It freezes well though, so that is a good option, and why baked goods like this are often in freezer sections. Nut bases often spoil more quickly.
This recipe is awesome. i have experimented with adding extra flavors too-. my favorite so far is rosemary, leeks, and goat gouda. thank you!
Love it! I adore rosemary in mine too! The. Cheese sounds amazing and I bet it’s great for the texture as well!
Do you HAVE THE NUTRITIONAL STATS ON THESE BREADS. sOME APPEAR TO BE VERY HIGH CARB.
I do not have that info. Though it’s not intended to be a low carb recipe, just a grain free one.
I do not have the stats. It’s intended to be gluten and grain free though, not low carb. But I’m sure you could plug it into a nutrition app. It won’t account for the amount of carb the fermentation eat up though, unfortunately.