
Bacon & Eggs Spaghetti Squash Nests
Ingredients:
4 cups lightly packed cooked spaghetti squash (12-14 ounces after cooking)
1/3 cup minced red onions
3 tablespoons oil
1 large egg
1 tablespoons fresh rosemary, finely chopped
1/4 cup almond flour (like THIS)
5 pieces of bacon, cooked crispy and crumbled
1 teaspoon or more coarse sea salt
cracked pepper to taste
4 large eggs (one for topping each nest)
more oil for frying the nests
Method:
1. Cooking the squash: Preheat the oven to 350 degrees. Cut the squash in half and clean out the seeds. Place the halves, cut side down in a large baking dish with about 1/4 inch of water at the bottom of of the dish.
2. Put the squash in the oven for about 15 min. After 15 minutes, take it out and check the spaghetti like fibers. After the first initial 15 min, continue cooking it in 10 min increments or less, checking often, until done. You know it’s ready when the strands just begin to pull apart. The squash should be ‘al dente’, but cooked enough to be able to separate the strands. Note: How long to cook the squash will vary on it’s size and ripeness. Watch it closely while cooking, or it can become too watery.
3. Remove from the oven and cool slightly. Using a fork, pull out the spaghetti like strand, then set them aside in a bowl. Can be kept in an airtight container, in the fridge for up to 3 days.
Making the nests:
4. Making the nests: Set the oven to a high broil and make sure the rack is in the middle of the oven.
5. Heat a skillet over medium heat. Add a few tablespoons of oil (I like to use the bacon grease from the bacon I just made.) Add the red onions and cook until soft and golden.
6. In a large bowl combine the squash, one large egg, the cooked onions, rosemary, almond flour, bacon, salt & pepper, then toss until well combined.
7. Heat a large cast iron skillet over medium heat, adding a little more oil to coat the pan. Scoop a generous 1/4 cup of the spaghetti mixture into the pan (you should be able to fit about 4 of these to a large skillet. If not just do 2 at a time.)
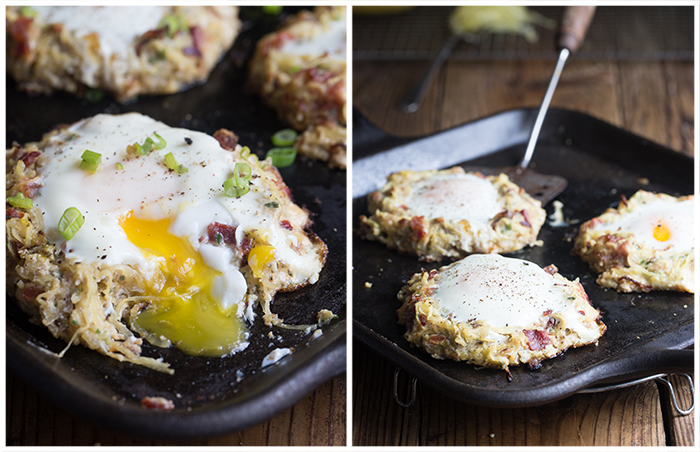
8. Working quickly, use a spoon to press and push in the center of the mound, making about a 1 inch well at the center and creating a “nest”. It should be slightly larger than an egg yolk. Let them fry for a minute to firm up just a bit, then crack an egg into each well.
9. Immediately widen the circle as needed to get the egg to nestle down into the squash. If the nest seems too loose, use a spatula to draw the sides in a bit. Sometimes a little egg white over flows. This is fine. I just pull the white off from the outside of the nest as it cooks. Assemble one nest at a time(including adding the egg), fitting about 2-4 nests into an average sized cast iron pan.
10. Cover the pan and continue to cook the nests until the bottom becomes browned and crispy underneath and around the edges, or for about 3-4 minutes (though the times will vary). The egg yolk will still be mostly uncooked.
11. Transfer the skillet to the middle rack under the broiler. Broil for for 2 1/2 to 3 min, depending on how you like your yolks. Keep a close eye on it. keep in mind that the yolk will continue to cook slightly after the nests have been removed from the oven.
12. Remove from the oven and sprinkle with a little coarse sea salt cracked pepper and chopped green onions, if desired. Transfer to a plate and serve.
[apsp-pin-image image_url=’https://www.pinterest.com/pin/148618856432470982/’]
[apsp-pin-image image_url=’https://www.pinterest.com/pin/148618856432471024/’]
How could I have gone my whole Paleo life without knowing and loving you? LOVE THIS. Are you on Pintrest or Twitter. Gonna plug you on facebook for our next Day of Discovery!
Awwwwe, thanks! YES, I am in pinterest…love pinterest and Twitter. I have a pinterest button at the top of the page to the left just below the header and my twitter link is on the right.
We just made these… genius and delicious. Eggs and spaghetti squash go together so well, and they were beautiful! Can't wait to post about it tomorrow 🙂
Maybe it was through you, I discovered this blog also. I have made similar thing with coconut flour. yummy either way.
Ooooh yes, I have made them with coconut flour. I do have another recipe like this on here with coconut flour minus the nestled egg part! I also added more specific instructions on cooking the squash, as it was turning out too watery for some. I also love it both ways. Works great with the Honeyville fine almond flour.
You mention only one egg in the ingredient list but mention adding it at two different times…..just wanted some clarification! 🙂 It's only added into the nest and not the squash mixture, yes?-!
Thanks!!! Looks SOOOO yummy. Can't wait to try it!
Michelle,
One egg is added to the squash mixture as stated in the instructions…however I did not list the eggs that would be 'nestled'. Didn't even notice that I missed that! I added the 'nestled' eggs to the ingredient list (you will need between 4 & 6 depending on the size of nest you make.
I have done the squash mixture without the egg and they turned out great, just didn't hold together as well the ones with it. Sorry for the confusion.
nice idea. thanks for sharing...