
This approach has led us through a number of amazing seasons. We’ve been vegetarians and vegans. We’ve embraced Ayurvedic cooking and medicine (learn more HERE) and explored all sorts of other fun and interesting choices. And as we’ve meandered down this path of discovery, we’ve found that some recipes just stuck with us, even when our journey evolved into another new phase. They’ve become our standards; the kind of beloved staples that one generation passes on to the next.
This blog was originally started as a way to share our journey, and the recipes we found along the way, with other people on this same path. For us, food has always been about community; about “breaking bread”…..even if we are in a time when “bread” is off the menu.
Even before I needed to be nightshade free for personal health reasons (learn more HERE), this tomato-less marinara was one of our family’s most treasured staples. It’s been in our family for over nine years. In fact, an earlier version of this recipe was the second post that I put up on here! It has evolved a bit over the years but I can honestly say that it is one of the greatest things that I have ever made. One of my favorite things being how packed with healthy vegetables it is. I’m super excited to be sharing it anew with you guys and I hope you enjoy it as much as we do…..maybe this will become a favorite for your family as well.


Tomato-less Marinara (No-mato sauce)
Whole30, Paleo, AIP, Nightshade Free
Makes about 12 1/2 cup servings (1.5 US quarts/1420ml)
For results that are most representative of this recipe, I recommend making it by the weights listed instead of volume (cups). You can also adjust the beet amount to your preferred taste.
Ingredients:
1-2 whole bay leaves
Method:
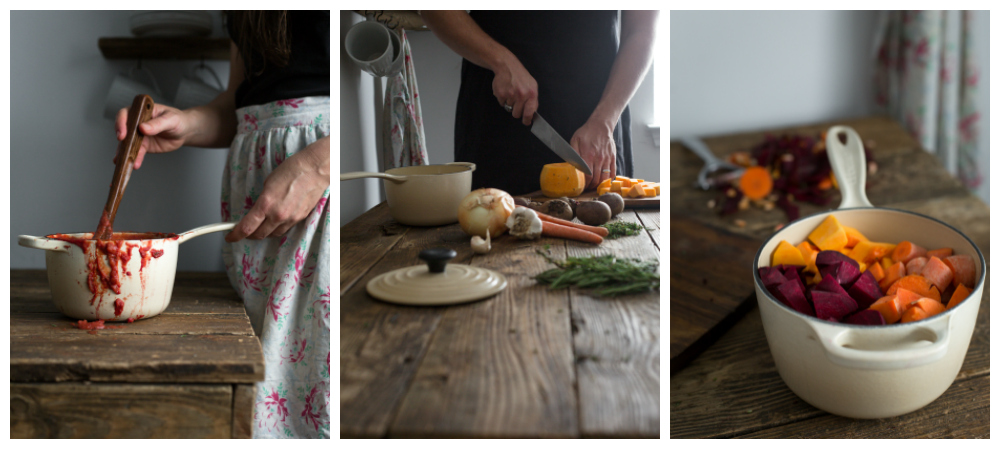
1. Prepare the first 5 ingredients as stated above, chopping, mincing, etc… set the garlic and onions aside (see “short cut” notes). Steam the carrots, butternut squash and beets together till soft (can be pierced with a skewer). This takes about 40 minutes with a stove top steamer, over a medium high heat. While the veggie mixture is cooking, heat the ghee (or other fat) over medium heat till melted and hot. Add the prepared garlic and onions to the hot pan and cook until they are caramelized and soft (this build flavor in the sauce by imparting flavor to the oil, as well as the adding flavor from browning.) Set aside until the rest of vegetables are ready.
Shortcut notes: Alternatively, buy pre peeled and cut squash & beets to save on time and work. Frozen veggies also work well for the steamer method. You can even get precooked beets at stores like Trader Joe’s and Whole Foods. For the cooking methods, I have also roasted all the veggies together ( including the onion and garlic), in a pre-heated 350 degree oven, until veggies were soft and the the onions golden. Really, both methods work, depending on if you want to use your oven or not. It’s not rocket science. Everything just needs to be cooked, and some methods build more flavor than others, as with all good sauces!) Heck, in the 9 years I’ve been making this sauce, I’ve even used canned veggies…though it is most definitely not the best way!
2. Transfer the steamed vegetables, onion mixture, 2 cups of water or wine mixture, vinegar and lemon juice to a blender container and pulse until it makes a nice “tomato sauce” like texture. I try not to do it so long that it’s creamy. A little texture gives it a nice authentic feel. Transfer to a medium sauce pan.
3. Stir in the bay leaves and herbs. Bring the sauce to a simmer over medium heat for a least 10 minutes*. Stir periodically to keep the sauce from sticking or burning to the bottom of the pan. Add more water as the sauce cooks down, to desired consistency. The thicker the sauce, the more it tends to splatter, so watch out! If you get it too thin, just reduce the sauce down until you reach the desired consistency again (A thicker sauce is great for pizza sauce, while a thinner one is great for pasta and such. It’s all good! This “cooking down” process develops flavor and richness, as well as reduces the “beet’ flavor. It also prevents the sauce from turning an interesting purplish color as it cools, haha!
4. Add the salt and cracked pepper to taste (salt really helps reduce any beet flavor, so don’t skimp). Remove from heat and throw out the bay leaf. Serve immediately or pour into mason jars and let cool to room temperature. Cover and store in the fridge for up to 5 days or freeze for up to 1 month. The sauce will thicken some once chilled. When ready to use, reheat over medium heat first, then add more water as needed. Makes 6 cups (1.5 quarts or 1420 ml)
I love to pair this sauce with my favorite, grain free pasta by Cappello’s. It is delicious! Or serve or anything!

I love this alternative to my red bell pepper sauce (which I found out I was allergic to)
Ahhhh, so sorry. Losing bell peppers what full of sadness for me to. I adored them on everything!
this looks delicious! For a pressure cooker, could you just put everything in to the pot at once (skip the steaming etc) and just let it cook that way all in one?
Well yes, the pressure cooker would be instead of the steam in. It's just another option for cooking the veggies. As to the onions and garlic, yes you could add them with the other veggies in the pressure cooker. But that will eliminate some of the savory flavor that is created from browning the onions and garlic.
thanks! Can't wait for your beautiful book 🙂
This looks AMAZING, but in addition to being night shade free, I'm also allergic to carrots (long story). Is there anything you'd recommend as a substitute? Parsnips, extra butternut squash?
Absolutely. Just use more butternut squash. It will change the flavor and color slightly but still be great. Even parsnips might be a cool flavor mix.
I am heading out of town, so as I looked upon the butternut squash at my favorite in town garden I told them I'm coming back–just to make your marinara sauce. So excited, because I simply cannot stand knowing someone cannot "break bread" with me due to allergies.
Love the "Pictures for Pinterest" feature!
This is such an interesting recipe! I've never thought or heard of a tomato-less marinara sauce. Really excited to give this a try! Thanks for sharing!
Is the wine a staple to this recipe or can it be omitted/replaced?
I have a note in the recipe that talks about the wine, that might be helpful.
could you perhaps substitute pumpkin or another type of winter squash for the butternut?
thanks!!
Of course subs are always possible. They will however change the final flavor profile from the exact one represented here. Certain ingredients making a stronger impact than others.
I would think Acorn Squash would be,a nice substitute. .. can’t wait to try this! Soo excited!
Have you ever made a chili with this? My husband really can't handle tomato sauce anymore, and looking to make chili when it gets cold. Thanks!
Not yet we haven't. But most because we can't have any form of nightshade and chili without peppers makes me sad, haha! Let me know if you try. My guess is it'd be delicious.
I have! It subbed perfectly for the “tomato sauce” my favorite chili recipe calls for. Made a huge batch and am finishing the last of it today. I shared with non-beet lovers and they loved it.
We are making tomorrow I think so I will let you know!
Awesome, can't wait to hear. Now it's all I can think about. Might even make some myself, nightshade repercussions and all, haha!
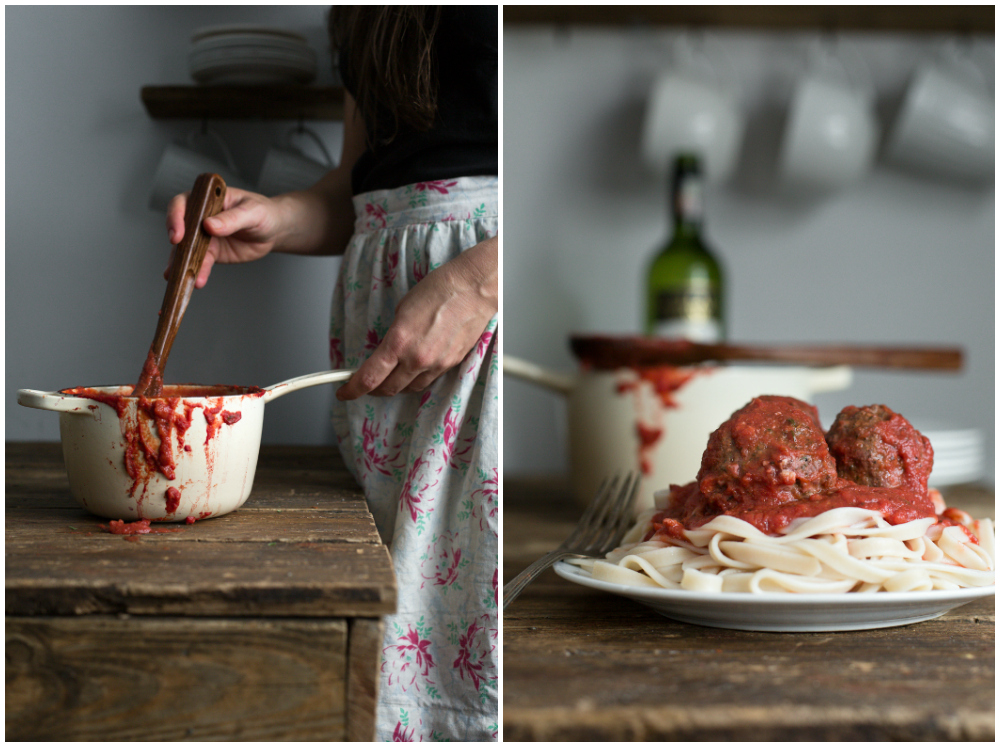
Absolutely love the photo of the saucepan with the apron. What a beautiful story!
This sauce is so delicious, I have it simmering for supper. I can't wait to see the reaction of my family when they taste it tonite!! Thank-you so much for posting this tomato less sauce. Now I won't miss my tomatoes!! I too have an autoimmune disease,Lupus.
I never Used such sauce at home I am always prefer to buy Tomato paste from market.
But it look very easy to do this at home.
thanks for sharing recipe for making sauce at home.
I am allergic to carrots and every tomato sauce replacement recipe has carrots. Can this recipe be adjusted to not include carrots? This one looks closest to what I can tolerate And looks Yummy! Thank You for sharing your recipe!!
Squash carrots, it's all the same really. The variety is just for flavor and depth. So just use more squash.
I never leave comments, but felt compelled to say that this sauce is DELICIOUS and makes me feel normal. Thanks Jenni!
Haha!Thank you, it made us feel normal too. About to make some today in fact.
My boyfriend just made this for me & this is hands down the best alternative to tomato sauce. Being that tomatoes do not sit well with my autoimmune condition, I have been without tomato sauce for over a year. Then I had this no-mato sauce and it changed my food game. Thank you so much! Tastes like a cheesy marinara to me and I can’t be more happier 🙂
I ended up having no wine in the house that I could use, so made with the balsamic recommendation. Just tasting so far it’s delicious, wishing I had tried this sooner! Can’t wait to have with some ground beef over spaghetti squash tonight!
My daughter can’t have anything fermented and is also allergic to lemons. Can I sub water or a veggie broth for the lemon, vinegar and wine?
You can but it will not taste like tomato sauce because it will lack acidity.
I just made this sauce tonight after six months of giving up all nightshade vegetables/spices due to an autoimmune disorder and it is just fantastic. I was so sad watching my family eating their big bowls of spaghetti and meatballs that I decided to give it a try – it will definitely become a staple for my diet from here on out. Thank you for your fabulous recipes and dedication to sharing them.
Thank you for this recipe and all of your other wonderful recipes! Fabulous!
I cannot WAIT to give this a try! I’m always on the hunt for a nomato/FAUXmato sauce recipe since some weird allergy struck 20 yrs ago (I noticed that eating certain foods caused my ankles to swell..so there went just about every Italian/Mexican/and some Soul Foods — like fried green tomatoes!). Not sure if it’s a nightshade issue or what (had 2 doctors tell me to “simply stop eating tomatoes” — insert deer-in-headlights look, punctuated with my sarcastic “Naw duh! Ya think?!” Still have yet to find ONE who can tell me why, at 29, I could no longer enjoy any of my tomato-based faves. But I digress..will be trying this one soon!
Jenni, your No’mato sauce recipe is so good it gave me tears when I first tasted it. Thank you. I compared several recipes and yours was by far the most complex in flavor. When recipes like yours become the silver lining to AIP paleo (w reintros), it makes is SO much easier to roll with eating this way. Cheers.
Hey Gwendolyn, what did you serve yours with? My mom is following AIP and I’m making her dinner tomorrow. 🙂
Hi, Olivia. If she’s completely AIP, we serve over sauteed spiralized zucchini (you can buy a cheap handheld spiralizer, which takes more time, or a countertop model that is faster). If she has reintroduced rice or lentils, we sometimes serve it over rice pasta or some of the cool lentil or quinoa pastas they sell in stores.
Have made a couple of different nomato sauces and this was the first one that really tasted like the pasta sauces we usually make at home! I’m putting this on my list for stocking-freezer-preparing-for-baby-party 🙂
I have been making chili with tomatoes for 40 years. I made it with this recipe the other day, and it was the best chili I’ve ever made!
I’m wondering if anyone has tried roasting the veggies at the start instead of steaming them. It seems like that might build even more flavor. I’m excited to try making this this weekend, after being nightshade free for about two years. Other nomato sauce recipes have seemed sad to me.
I have toasted then and it is good. The steaming goes a brighter flavor more like a Marinara sauce. Toasting gives a darker tomato sauce flavor. Both are delicious. Mostly it’s just about cooking the vegetables so you can purée them. Some people pressure cook them as well.
Can we add mint and onion in this recipe? I love the flavor of mint and onion in all dishes. Please reply I am waiting for your response.
I think that would taste amazing!
I can’t do wine and I added wayyyy too much vinegar. It’s so acidic! Someone help?
You only would add vinegar to taste, not 1:1, and it really should be balsamic for the wine sub. It only takes very little.
this looks amazing and am cooking up a batch this minute. like a few other bloggers, can’t do wine but am sub’ing
in verjus. thanks for sharing your recipe!
🙂
Agreed, I can’t always do win either. I’ve included subs when wine is omitted.
Just made this to make my famous chili which i havent eaten in over a year due to tomato intolerance and wow it is sooooooo Good!
Thank you for your hard work in keeping us weLl fed and hapPy!
I just made this sauce and it is divine. I followed the recipe exactly and can’t believe how much it tastes like tomato sauce. Thank you thank you thank you
Yea! So glad you loved it. It was a lifesaver for me. I LOVE tomato sauce!
From this year forth, as butternut squashes become available at the farmer’s market beside baskets of carrots and beets, it will mean it is time to make some incredible nightshade-free marinara. I made a quadruple batch today, adding fresh basil and oregano, and reducing the lemon juice by one tablespoon per recipe, as suits my family’s preference. I made it for my mom, and she no longer misses marinara. Even my dad, who eats all foods, deemed it “excellent.” Thank you for once again bringing joy to our lives through great food.
Does this freeze well? Wondering if i can make a bigger batch and freeze for easier dinners??
Yes,it does freeze well!
Yes, it does freeze well!
Could this be canned? Like same way you can tomato sauce?
There are very specific acid requirements needed for canning and I am not sure if this meets those requirements. I recommend freezing instead.
I have made this recipe many times, and absolutely love it! I have had it over spaghetti squash, zucchini noodles, it is even my go to sauce for lasagna. I am interested in preserving food for a easier and quicker food prep lifestyle so I can actually maintain healthy eating through full time school and full time work. I noticed you said this froze really well and that canning might be problematic. Is there any helpful tips or anything to freezing it best? Again I absolutely love this recipe (and I don’t have to avoid tomatoes this is just so flavorful I prefer it over regular tomato sauce) and thank you for sharing!
Will purple and yellow carrots work or do you need the orange pigment?
The orange pigment definetly helps with the color. Yellow might work well.
Does it freeze well?
I’ve never tried, but based on the ingredients, I would think so.
This sauce just blew my mind. Totally tastes like marinara, and my 6-year old devoured it. Bless you (and the sauce, if that’s possible).
This is so wonderful! So happy you enjoyed it!
Can you expLain how to cook the zucchini noodles?thanks
Just made this for dinner toNite and it’s Amazing! Had my housemate fooled. It onl lasts for 5 days in the fridge? And why would it only Last one month in the freezer? I thought when you freeze things they can last way lOnger. Thanks
I’m sure you can freeze it for however long you are comfortable with.
Just found this and made it yesterday! WOw aM i a Happy person! I have nightshade allergies, gluten and dairy allergies. Raised in an italian family it was hard for thEm to understand why i couldnt eat anything. ThIs was So nice tO use in lasagna. Thank you!
Yassss! This is so good to hear. Love that it worked for you!
Thank you for this recipe. I have histamine issues so I had to leave out the vinegar, wine, and lemon juice. Instead I opened up 7, 1 gram capsules of tapioca derived vitamin C for the acid and it turned our very well. I thought I would share that just in case it helped anyone else. I got to enjoy “spaghetti (squash) and meatballs” for the first time in years!
That sounds like a fabulous sub! Love it!
Wow! This is an amazing recipe. My dad started a very rest diet to try and get him off his insulin so I needed ALTERNATIVES to TOMATOES. Fantastic recipe! I weigh everything so that helps keep the flavors balanced.
So glad you enjoy it! I love weighing too, makes everything easy and more no fail!🙌🏼